Table of Contents
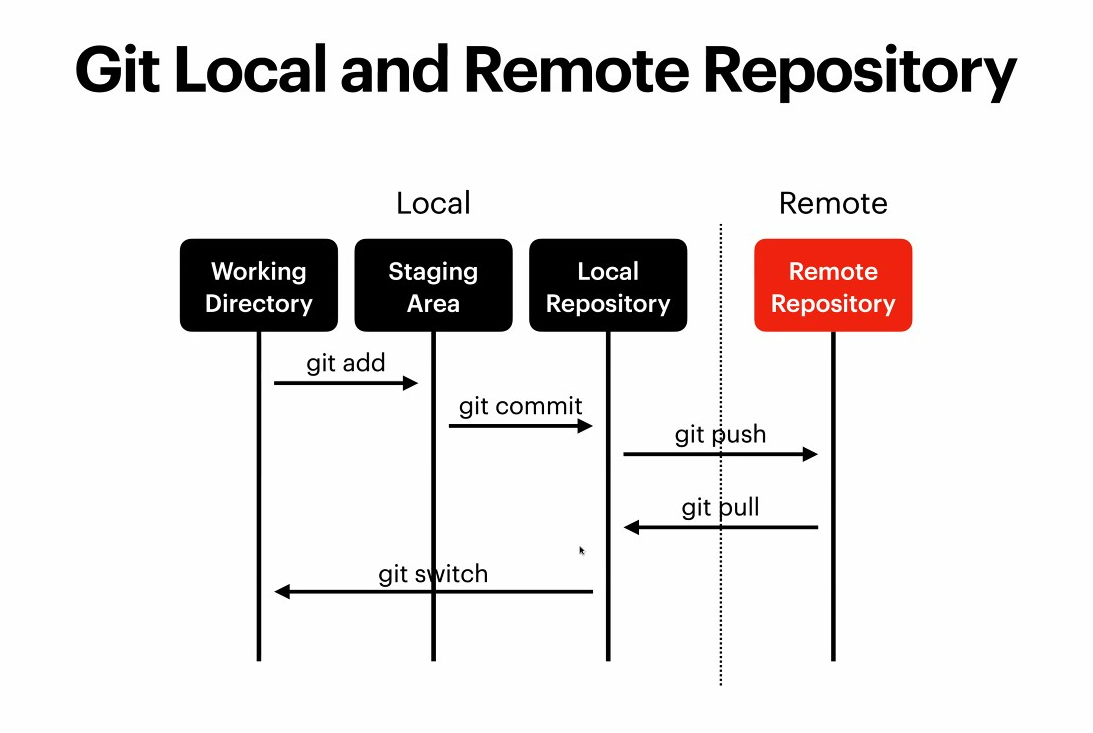

다음 명령어 시퀀스는 Git 버전 관리 시스템을 사용하는 프로젝트의 일반적인 작업 흐름을 보여줍니다.
다양한 Git 명령을 사용하여 로컬 저장소를 관리하고, 새로운 브랜치를 만들고, 파일 변경 사항을 커밋하는 과정을 거칠겁니다. 정리하면 우리는 다음과 같은 작업을 수행할 겁니다.
#1. **리포지토리 클론**: 사용자는 GitHub에서 `branch-practice2`라는 리포지토리를 클론합니다.
# 이는 원격 저장소의 내용을 로컬 컴퓨터로 복사합니다.
# 2. **브랜치 생성**: `git branch py-init` 명령을 사용하여 `py-init`이라는 새로운 브랜치를 만듭니다.
# main 브랜치에서 안전하게 나의 브랜치 py-init 를 만들어 이 곳에서 활동할 겁니다.
#3. **브랜치 전환**: `git switch py-init` 명령으로 main에서 `py-init` 브랜치로 전환합니다.
#4. **파일 생성**: `touch main.py` 명령을 통해 `main.py` 파일을 생성합니다.
# 5. **파일 추가 및 커밋**: 생성된 `main.py` 파일을 `git add main.py` 명령으로 스테이징 영역에 추가하고, # `git commit` 명령을 사용하여 이 변경 사항을 커밋합니다.
# 6. **메인 브랜치로 병합**: `py-init` 브랜치에서 개발한 내용을 메인 브랜치(`main`)로 병합합니다.
# 이를 위해 먼저 `main` 브랜치로 전환한 다음, `git merge py-init` 명령을 실행합니다.
# 7. **브랜치 삭제**: `git branch -D py-init` 명령으로 더 이상 필요 없는 `py-init` 브랜치를 삭제합니다.
# 8. **반복연습** **새 브랜치 생성 및 작업**: `git branch py-hello`와 `git switch py-hello` 명령으로 `py-hello` 브랜치를 생성하고 전환합니다.
#9. **파일 수정 및 다시 커밋**: `main.py` 파일을 수정하여 "hello"를 세 번 출력하게 변경하고, 이 변경을 스테이징하고 커밋합니다.
# 커밋 메시지로는 "feat: Repeat print() for 3 Times On Branch py-hello"를 사용합니다.
#10.**메인 브랜치로 병합**:`py-hello` 브랜치에서 개발한 내용을 메인 브랜치(`main`)로 병합합니다.
# 이를 위해 먼저 `main` 브랜치로 전환한 다음, `git merge py-hello` 명령을 실행합니다.
#11.**main으로 push**: 모든 코드가 완성되었다면 이제 main으로 push한다.
#여기서는 팀원이 1명이기 때문에 main으로 push를 했지만
#원래 팀원은 main에서 push하면 안된다. 다른 팀원들과 충돌날 수 있기 때문이다.
#팀원은 merge를 하고 팀장이 push한다.
#모든 작업이 끝났으면 py-hello branch도 삭제해 준다.
다음은 실습코드입니다. git bash에서 실행해봅시다.
user@BOOK-KQ1J15SE7A MINGW64 ~
$ cd Documents/dev

#1. **리포지토리 클론**: 사용자는 GitHub에서 `branch-practice2`라는 리포지토리를 클론합니다.
# 이는 원격 저장소의 내용을 로컬 컴퓨터로 복사합니다.
user@BOOK-KQ1J15SE7A MINGW64 ~/Documents/dev
$ git clone https://github.com/helloyoonjae/branch-practice2.git
Cloning into 'branch-practice2'...
remote: Enumerating objects: 4, done.
remote: Counting objects: 100% (4/4), done.
remote: Compressing objects: 100% (3/3), done.
remote: Total 4 (delta 0), reused 0 (delta 0), pack-reused 0
Receiving objects: 100% (4/4), done.


user@BOOK-KQ1J15SE7A MINGW64 ~/Documents/dev
$ cd branch-practice2


user@BOOK-KQ1J15SE7A MINGW64 ~/Documents/dev/branch-practice2 (main)
$ git branch
* main

user@BOOK-KQ1J15SE7A MINGW64 ~/Documents/dev/branch-practice2 (main)
$ git branch -r
  origin/HEAD -> origin/main
  origin/main

user@BOOK-KQ1J15SE7A MINGW64 ~/Documents/dev/branch-practice2 (main)
$ git remove -v
git: 'remove' is not a git command. See 'git --help'.

The most similar command is
        remote

user@BOOK-KQ1J15SE7A MINGW64 ~/Documents/dev/branch-practice2 (main)
$ git remote -v
origin  https://github.com/helloyoonjae/branch-practice2.git (fetch)
origin  https://github.com/helloyoonjae/branch-practice2.git (push)

user@BOOK-KQ1J15SE7A MINGW64 ~/Documents/dev/branch-practice2 (main)
$ git branch -a
* main
  remotes/origin/HEAD -> origin/main
  remotes/origin/main


# 2. **브랜치 생성**: `git branch py-init` 명령을 사용하여 `py-init`이라는 새로운 브랜치를 만듭니다.
user@BOOK-KQ1J15SE7A MINGW64 ~/Documents/dev/branch-practice2 (main)
$ git branch py-init

user@BOOK-KQ1J15SE7A MINGW64 ~/Documents/dev/branch-practice2 (main)
$ git branch
* main
  py-init


#3. **브랜치 전환**: `git switch py-init` 명령으로 `py-init` 브랜치로 전환합니다.
user@BOOK-KQ1J15SE7A MINGW64 ~/Documents/dev/branch-practice2 (main)
$ git switch py-init
Switched to branch 'py-init'

user@BOOK-KQ1J15SE7A MINGW64 ~/Documents/dev/branch-practice2 (py-init)
$ git branch
  main
* py-init


#4. **파일 생성**: `touch main.py` 명령을 통해 `main.py` 파일을 생성합니다.
user@BOOK-KQ1J15SE7A MINGW64 ~/Documents/dev/branch-practice2 (py-init)
$ touch main.py

user@BOOK-KQ1J15SE7A MINGW64 ~/Documents/dev/branch-practice2 (py-init)
$ ls
LICENSE  README.md  main.py

user@BOOK-KQ1J15SE7A MINGW64 ~/Documents/dev/branch-practice2 (py-init)
$ git status
On branch py-init
Untracked files:
  (use "git add <file>..." to include in what will be committed)
        main.py

nothing added to commit but untracked files present (use "git add" to track)


# 5. **파일 추가 및 커밋**: 생성된 `main.py` 파일을 `git add main.py` 명령으로 스테이징 영역에 추가하고,
user@BOOK-KQ1J15SE7A MINGW64 ~/Documents/dev/branch-practice2 (py-init)
$ git add main.py

# `git commit` 명령을 사용하여 이 변경 사항을 커밋합니다.
user@BOOK-KQ1J15SE7A MINGW64 ~/Documents/dev/branch-practice2 (py-init)
$ git commit
[py-init be16b9f] feat: Create main.py
 1 file changed, 0 insertions(+), 0 deletions(-)
 create mode 100644 main.py

user@BOOK-KQ1J15SE7A MINGW64 ~/Documents/dev/branch-practice2 (py-init)
$ git status
On branch py-init
nothing to commit, working tree clean

user@BOOK-KQ1J15SE7A MINGW64 ~/Documents/dev/branch-practice2 (py-init)
$ ls
LICENSE  README.md  main.py


# 6. **메인 브랜치로 병합**: `py-init` 브랜치에서 개발한 내용을 메인 브랜치(`main`)로 병합합니다.
# 이를 위해 먼저 `main` 브랜치로 전환한 다음, `git merge py-init` 명령을 실행합니다.
user@BOOK-KQ1J15SE7A MINGW64 ~/Documents/dev/branch-practice2 (py-init)
$ git switch main
Switched to branch 'main'
Your branch is up to date with 'origin/main'.

user@BOOK-KQ1J15SE7A MINGW64 ~/Documents/dev/branch-practice2 (main)
$ git merge py-init
Updating 2444cd6..be16b9f
Fast-forward
 main.py | 0
 1 file changed, 0 insertions(+), 0 deletions(-)
 create mode 100644 main.py

user@BOOK-KQ1J15SE7A MINGW64 ~/Documents/dev/branch-practice2 (main)
$ ls
LICENSE  README.md  main.py

user@BOOK-KQ1J15SE7A MINGW64 ~/Documents/dev/branch-practice2 (main)
$ git branch
* main
  py-init

# 7. **브랜치 삭제**: `git branch -D py-init` 명령으로 더 이상 필요 없는 `py-init` 브랜치를 삭제합니다.
user@BOOK-KQ1J15SE7A MINGW64 ~/Documents/dev/branch-practice2 (main)
$ git branch -D py-init
Deleted branch py-init (was be16b9f).

user@BOOK-KQ1J15SE7A MINGW64 ~/Documents/dev/branch-practice2 (main)
$ git branch
* main

# 8. **새 브랜치 생성 및 작업**: `git branch py-hello`와 `git switch py-hello` 명령으로 `py-hello` 브랜치를 생성하고 전환합니다.
# 여기서 `main.py` 파일을 수정하고, 수정된 파일을 커밋합니다.
user@BOOK-KQ1J15SE7A MINGW64 ~/Documents/dev/branch-practice2 (main)
$ git branch py-hello

user@BOOK-KQ1J15SE7A MINGW64 ~/Documents/dev/branch-practice2 (main)
$ git branch
* main
  py-hello

user@BOOK-KQ1J15SE7A MINGW64 ~/Documents/dev/branch-practice2 (main)
$ git switch py-hello
Switched to branch 'py-hello'

user@BOOK-KQ1J15SE7A MINGW64 ~/Documents/dev/branch-practice2 (py-hello)
$ ls
LICENSE  README.md  main.py

user@BOOK-KQ1J15SE7A MINGW64 ~/Documents/dev/branch-practice2 (py-hello)
$ vi main.py

user@BOOK-KQ1J15SE7A MINGW64 ~/Documents/dev/branch-practice2 (py-hello)
$ python main.py
hello

user@BOOK-KQ1J15SE7A MINGW64 ~/Documents/dev/branch-practice2 (py-hello)
$ cat main.py
print('hello')

user@BOOK-KQ1J15SE7A MINGW64 ~/Documents/dev/branch-practice2 (py-hello)
$ git status
On branch py-hello
Changes not staged for commit:
  (use "git add <file>..." to update what will be committed)
  (use "git restore <file>..." to discard changes in working directory)
        modified:   main.py

no changes added to commit (use "git add" and/or "git commit -a")

user@BOOK-KQ1J15SE7A MINGW64 ~/Documents/dev/branch-practice2 (py-hello)
$ git add main.py
warning: in the working copy of 'main.py', LF will be replaced by CRLF the next time Git touches it

user@BOOK-KQ1J15SE7A MINGW64 ~/Documents/dev/branch-practice2 (py-hello)
$ git status
On branch py-hello
Changes to be committed:
  (use "git restore --staged <file>..." to unstage)
        modified:   main.py


user@BOOK-KQ1J15SE7A MINGW64 ~/Documents/dev/branch-practice2 (py-hello)
$ git commit
[py-hello bf00024] feat: Add print()
 1 file changed, 1 insertion(+)

user@BOOK-KQ1J15SE7A MINGW64 ~/Documents/dev/branch-practice2 (py-hello)
$ git status
On branch py-hello
nothing to commit, working tree clean


#9. **파일 수정 및 다시 커밋**: `main.py` 파일을 수정하여 "hello"를 세 번 출력하게 변경하고, 이 변경을 스테이징하고 커밋합니다.
# 커밋 메시지로는 "feat: Repeat print() for 3 Times On Branch py-hello"를 사용합니다.
user@BOOK-KQ1J15SE7A MINGW64 ~/Documents/dev/branch-practice2 (py-hello)
$ vi main.py

user@BOOK-KQ1J15SE7A MINGW64 ~/Documents/dev/branch-practice2 (py-hello)
$ python main.py
hello
hello
hello

user@BOOK-KQ1J15SE7A MINGW64 ~/Documents/dev/branch-practice2 (py-hello)
$ git status
On branch py-hello
Changes not staged for commit:
  (use "git add <file>..." to update what will be committed)
  (use "git restore <file>..." to discard changes in working directory)
        modified:   main.py

no changes added to commit (use "git add" and/or "git commit -a")

user@BOOK-KQ1J15SE7A MINGW64 ~/Documents/dev/branch-practice2 (py-hello)
$ git add main.py
warning: in the working copy of 'main.py', LF will be replaced by CRLF the next time Git touches it

user@BOOK-KQ1J15SE7A MINGW64 ~/Documents/dev/branch-practice2 (py-hello)
$ git commit -m "feat: Repeat print() for 3 Times
> On Branch py-hello"
[py-hello cb3ae1f] feat: Repeat print() for 3 Times On Branch py-hello
 1 file changed, 2 insertions(+), 1 deletion(-)


 #10.**메인 브랜치로 병합**:`py-hello` 브랜치에서 개발한 내용을 메인 브랜치(`main`)로 병합합니다.
# 이를 위해 먼저 `main` 브랜치로 전환한 다음, `git merge py-hello` 명령을 실행합니다.
 user@BOOK-KQ1J15SE7A MINGW64 ~/Documents/dev/branch-practice2 (py-hello)
$ git switch main
Switched to branch 'main'
Your branch is ahead of 'origin/main' by 1 commit.
  (use "git push" to publish your local commits)

user@BOOK-KQ1J15SE7A MINGW64 ~/Documents/dev/branch-practice2 (main)
$ git merge py-hello
Updating be16b9f..cb3ae1f
Fast-forward
 main.py | 2 ++
 1 file changed, 2 insertions(+)

user@BOOK-KQ1J15SE7A MINGW64 ~/Documents/dev/branch-practice2 (main)
$ ls
LICENSE  README.md  main.py

user@BOOK-KQ1J15SE7A MINGW64 ~/Documents/dev/branch-practice2 (main)
$ python main.py
hello
hello
hello

user@BOOK-KQ1J15SE7A MINGW64 ~/Documents/dev/branch-practice2 (main)
$ cat main.py
for _ in range(3):
    print('hello')

#11.**main으로 push**: 모든 코드가 완성되었다면 이제 main으로 push한다.
#여기서는 팀원이 1명이기 때문에 main으로 push를 했지만
#원래 팀원은 main에서 push하면 안된다. 다른 팀원들과 충돌날 수 있기 때문이다.
#팀원은 merge를 하고 팀장이 push한다.
#모든 작업이 끝났으면 py-hello branch도 삭제해 준다.
user@BOOK-KQ1J15SE7A MINGW64 ~/Documents/dev/branch-practice2 (main)
$ git push origin main
Enumerating objects: 10, done.
Counting objects: 100% (10/10), done.
Delta compression using up to 16 threads
Compressing objects: 100% (6/6), done.
Writing objects: 100% (9/9), 832 bytes | 832.00 KiB/s, done.
Total 9 (delta 2), reused 0 (delta 0), pack-reused 0 (from 0)
remote: Resolving deltas: 100% (2/2), done.
To https://github.com/helloyoonjae/branch-practice2.git
   2444cd6..cb3ae1f  main -> main
이러한 과정은 Git의 기본적인 브랜치 관리와 커밋 관리를 잘 보여줍니다.
사용자는 이 과정을 통해 코드의 버전을 효과적으로 관리하며, 필요에 따라 특정 버전의 코드를 다른 사람들과 공유하거나 병합할 수 있습니다.
2024.04.23 - [분류 전체보기] - Git commit 메시지
2024.04.23 - [분류 전체보기] - [학습블로그]Git 협업 프로젝트 수행
2024.04.19 - [Upstage AI 3기] - [학습블로그] Git 을 Git Bash에서 작동시켜보자
'Upstage AI 3기' 카테고리의 다른 글
| [학습블로그] Git commit 메시지 (0) | 2024.04.23 |
|---|---|
| [학습블로그]Git 협업 프로젝트 수행 (0) | 2024.04.23 |
| [학습블로그] Git 을 Git Bash에서 작동시켜보자 (0) | 2024.04.19 |
| [학습블로그] python을 안다면 Fast API로 웹 사용자와 소통해보자 (0) | 2024.04.09 |
| [학습블로그] 프로젝트 수행을 위한 이론 1 : Python (1) | 2024.04.04 |
- Total
- Today
- Yesterday
- Array
- speaking
- English
- Transformer
- nlp
- t5
- LIST
- 리스트
- 코딩테스트
- 파이썬
- #패스트캠퍼스 #패스트캠퍼스ai부트캠프 #업스테이지패스트캠퍼스 #upstageailab#국비지원 #패스트캠퍼스업스테이지에이아이랩#패스트캠퍼스업스테이지부트캠프
- #패스트캠퍼스 #패스트캠퍼스AI부트캠프 #업스테이지패스트캠퍼스 #UpstageAILab#국비지원 #패스트캠퍼스업스테이지에이아이랩#패스트캠퍼스업스테이지부트캠프
- RAG
- Github
- 손실함수
- #패스트캠퍼스 #UpstageAILab #Upstage #부트캠프 #AI #데이터분석 #데이터사이언스 #무료교육 #국비지원 #국비지원취업 #데이터분석취업 등
- Lora
- Hugging Face
- clustering
- PEFT
- 오블완
- LLM
- Numpy
- recursion #재귀 #자료구조 # 알고리즘
- git
- 해시
- 티스토리챌린지
- cnn
- classification
- Python
| 일 | 월 | 화 | 수 | 목 | 금 | 토 |
|---|---|---|---|---|---|---|
| 1 | 2 | 3 | ||||
| 4 | 5 | 6 | 7 | 8 | 9 | 10 |
| 11 | 12 | 13 | 14 | 15 | 16 | 17 |
| 18 | 19 | 20 | 21 | 22 | 23 | 24 |
| 25 | 26 | 27 | 28 | 29 | 30 | 31 |